Saturday, October 17, 2015

New Pictures and Photography club

Hi everyone!

College is very stressful but I believe in myself and I will do great. Positive things is what I need! So I told you all that I joined the photography club but I haven't really been a active member in it because I was trying out for the softball team. I did not make it on the softball team and that makes me every upset, but now I can focus all my time to photography and this blog.

This past Thursday's meeting was a meeting for beginners. I wouldn't really call myself a beginner but I was like, I could always learn more. Going to that meeting really showed me that I wasn't as smart as I thought. I really exciting to be part of this club and the board is really nice.

Things I'm gonna work on:
1. Manual Focusing
-I did this a lot with film cameras but it's a lot different now
2. Manual Aperture and Shutter speed
-I think this is going to be hard for me but I'm gonna try my best
3. Taking loads of pictures
-taking pictures is the only way that I'll be able to practice so more clicking for me

Lastly here are two pictures that I took yesterday and hope you like. Better quality will be on my flickr page.


Flickr
Instagram

I'll see you guys at my next exposure

-Jess


Sunday, September 27, 2015

New Flickr page!

Hello everyone!

I am here to tell you about my new Flickr page. I had to make a yahoo email account for one of my college class so I decided to make a Flickr with it. The Flickr page is also for my photography class here. I joined the group so it is easier to sent pictures to them.

I am thinking that I delete my Instagram account because it is so much harder for my to upload picture there. On the Flickr account it is so much easier to upload so please go over and check my account.
Please tell me if you like it better there because I am having a really hard time keeping up my Instagram.

The Link to my Flickr account is below. Feel free to follow me. Also I have already uploaded some pictures so favor them and comment on them!


https://www.flickr.com/photos/134403621@N02/ 

Thanks for reading and I'll see you at my next exposure!

-Jess

Friday, September 11, 2015

I'm excited, RU?

Hello everyone!

LOL I know I haven't posted anything in a long long long time but I have some very exciting new that will make everything better!

I have recently gone to college so I have some stuff to do but this is where you get excited.....
I joined my colleges photography club! This is very exciting because this will force me to take more pictures. They are such a nice group of people and I can't wait to start submitting photos.

Now there is a big problem.... I am also joining the club softball team, which is very exciting, but the the photography meetings and softball practices are on the same day same TIME! But don't you worry, photography meetings are only 2 times a week so I will still have time to go. I will try my hardest to manage my time wisely because I am still here for education and want to get good marks.

Second exciting news..... the school computer lab has PHOTOSHOP!!!! This means that I can edit my photographssssss. I was so happy about this that I almost screamed in the computer lap which is not allowed.

Anyway I will try to update a little more and post my photos on my instagram. And you can also look at my photography club's flickr. You should comment nice things and fav all the pictures.

I will end with a photo that I just photoshoped for fun and I'll see you at my next exposure!


-Jess

Friday, July 31, 2015

Free Choice Friday(#2): Ant-Man review!

What's up everyone!

Hope summer is treading you well. Today is another Free Choice Friday where I am going to review the movie Ant-Man. (Don't ask me why there's a dash in the middle.)

Now I don't know if you guys know but I'm a huge Marvel fan and I was pretty excited for this. If you're not a big fan of Marvel I'll give you a little overview.

Title: Ant-Man (2015)
Rate: PG-13
Length: 117 minutes 
Summary: Armed with a super-suit with the astonishing ability to shrink in scale but increase in strength, cat burglar Scott Lang must embrace his inner hero and help his mentor, Dr. Hank Pym, plan and pull off a heist that will save the world.

(Information came from IMDB)


So I'm going to give my thoughts without giving away any spoilers.

Thoughts going into the film...
I was really excited to watch this movie because I love anything marvel. Super hero/action movies are my favorite genera so I was excited to see the fighting and CGI parts.

I really had not ideal what the film was about going into the film. Even though I say I'm a Marvel fan I don't really know all of the super hero's stories because I didn't read the comics. Also I don't like to spoil anything for myself so I didn't watch any trailers.

Thoughts after the film...
I was so so happy after the film. I just felt like everything was done right. Marvel does this great thing where they pick perfect people to be each character. The visual effects and filming were so good (recently I've been very interested in filming and editing). The comedy was top, the right amount where it was both serious and funny.

Although I didn't go into the film knowing a whole lot, I understood the movie as it went along and got the whole thing by the end of the film.

Recommendations...   
Although Ant-Man isn't a super popular in the super hero universe, everyone should watch it because its such a great movie. Think of it like Guardians of the Galaxy, no one knew them but the movie was great. Anyone can watch it from any age and still enjoy it.

Thanks for reading my review. I know I'm not good at these but I'll try to get better. Thanks for reading and I'll see you at my next exposure!

Jess

Monday, July 20, 2015

Project #4 For Digital

Hey hey everyone!

I hope that everyone is having a great great day because everyone deserves to be happy!

So the next project I'm going to show you is Night photography. This ended up being a project that I really really liked.

Night
For this project we had to take 3 types of pictures, one at a long shutter speed, regular flash, and a ghost shot. A ghost shot is when you set up your camera with a tripod and a long shutter speed. C lick to take the picture and walk in the middle of it and it will create a "ghost" image of you.

I'm putting in example picture of the projects to give you  and ideal and then I will show you my pictures.

These are NOT my pictures.

Long shutter speed 


Flash


Ghost

Now my pictures 


So these are my pictures, I hope you like them. My least favorite one is the ghost one but that's ok. Thank you for reading and I'll see you at my next exposure!

-Jess

Monday, July 13, 2015

Project #3 For Digital

Ello people!

Hope everyone is having a great summer! I am here today to show you guys my next project from digital. This next project was kind of like 2 projects put together but I'll show you guys both. Sooooooo lets get started!

Photo journalism
The point of this project is to take pictures of people so they don't notice you. This project is good if you want to be a journalist and write about news. I love taking pictures of strangers even though it totally weird. I just feel like it's sometimes harder to take pictures of people you know.


So I'm not going to write a caption for all of them like the last post because this wasn't really one of my favorite projects. But when I was looking through all my pictures from the day (we had a class trip for this project) I noticed that I had a lot of pictures of girls with pink jackets on. So this project turned into little girls with pink jackets. 

Architecture
This project was to take old pictures and edit them in a cray weird way. I only had one really good picture of Architecture and the rest I had to take from shutterfly. I didn't so much like this project but I do like taking pictures of buildings because it think Architecture is amazing. 


So the last 2 pictures I used a lot of different and weird filters on. The first one I really like a lot but the quality doesn't look so good. The only thing I did to the first on was that I added blue. 

So this is my 3rd project. I hope you guys liked it! If you try out any of these projects comment below the link to your picture and I'll check it out. Thanks for reading and I'll see you at my next exposure! 

-Jess


Friday, July 3, 2015

Project #2 For Digital

Hello everyone!

Happy 4th of July! It is so nice to not be in school but not nice to be planing for college :(. This is going to be a short post today because the next project was only for one picture.

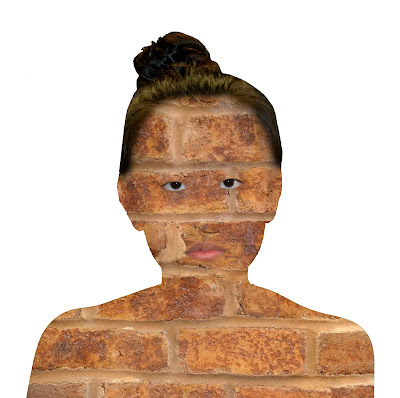
This project is called Surrealism. For this project you had to take a few pictures and put them together to make make believe scenarios.

Some famous examples:


These are some examples my teacher showed me in class. And the next picture is my project. 


So this is my Surrealism project. What I did was take a picture myself and took a picture of a brick wall. I edited it to make it look like my skin. So in the beginning of this project I had a really big idea that I wanted to use a picture of myself an make myself a tree girl. So my skin would be the bark and my hair would be the branches and leaves. I had taken all my pictures for that project but then my SD broke and I lost all my pictures. This photo only had 2 pictures but my teacher loved it so much that she said it was fine.  This picture won me an award for our local art show. 

I was so upset about losing all my pictures on my SD card and felt like I would die. Even though that happened a really good project and an award came out of it. So something bad happens, try and look for the good side because something better could come out of it. 

So I hope you all like my photo and you have a great day. I'll see you at my next exposure! 

-Jess 


Sunday, June 28, 2015

Project #1 for Digital

Hey hey everyone!

I'm so sorry about how slow I was with all my posts! I just had my prom and graduated last week so summer is all free for blogger. I will really try hard to make an effort to blogging. Today I will be showing you my first project from digital photography. Our first project was macro, opposites, point of view,  and shapes. These were really simple projects that our teacher assigned us so we could learn how to use or cameras.

Macro
Macro is a really close up shot of an object. The background is a usually a little blurry. For this project I didn't have a macro lens but if you zoom up really close on an object it gives it a macro like effect. There is also a macro setting on most camera, it should be a flower icon.


This picture I took at the mall. It was a piece of clothing that was through a window. I'm surprised how clean it came out since I shot it through a window. 


This is one of my favorite pictures because it is so clear. I took this outside on a sunny day. 


This is just a picture of a tree. It don't really like this one because it's boring but the details are nice.


I love the color of the strawberry but this is mostly because of photoshop. I do like this picture but i wish the background wasn't my ugly table. 
Shapes
Shapes are everywhere so you could pretty much take pictures of this project everywhere.

This picture was taken at the mall near my house. I really like this shot because it was so clear. Also this sky light is new to the mall so I thought it was pretty. 


This is a car's hubcap. I don't know who's car this is but it was good for a picture! haha. My teacher said that if I as more professional then she would make me clean all the metal.   


This picture was also taken at the mall. Its the side of an elevator . This shot is nice but not so interesting.


I hate this picture so I'm just not gonna say anything about it. 

Opposites
This was the hardest project to take because I couldn't think of any creative shots to take. I ended up taking a shot that my teacher suggested me and my other shot was by accident.


This picture was the accident that ended up working for the project.  I really really love this picture though. 

This picture counted as an opposite because I am taking a picture outside the car but I'm taking it for inside the car. This is really just an okay picture for me.
Point of View
I really love the style of this picture and how the plants are in the center. the coffee spilled is really funny though. 

I hated editing this picture because my teacher wanted me to take out all the lights on the roof. It was so annoying but it turned out nice. 


So these are all of the pictures from the first projects from my digital class. If you don't really know what to take picture of these projects are really helpful. They help you refresh you mind about you pov and maybe you'll get some great pictures out of it! 

Well thanks for reading and I'll post another one so! See you all at my next exposure!

-Jess


Wednesday, May 20, 2015

I AM BACK

Hey everyone!
Sorry about not updated in so long but I have been really busy with school.
I am not ready to get back into posting action. I don't think I can update that frequently but I'll try my best!
Thanks everyone!
-Jess

Sunday, April 5, 2015

First time I dropped my camera

Hello everyone.

Spring has just started but it's still so cold. I am on spring break now so that's a big plus! I can take way more pictures and start studying for APs -.-. The first day of spring for me was snowing like crazy and that reminded me about something dreadful that happened in the winter.

One days I went over to my friends house to take some pictures. It was really cold because it was still winter but we still wanted to take some pictures outside. So all we did was we went around her neighborhood. Our first stop was this park near her house. There was this baseball field covered by snow and there was only one pathway shoved for people to walk. We were walking on the path and taking pictures as you do. My friend stopped to take some pictures when I saw a water fountain.

The first thing that came into my head was "I want to stand on that" so that's what I did. My friend turned around from her picture and said "how did you get up their so fast". She turned her camera towards me to take a picture and when to pose and then........ it happened.

I dropped my camera.

When it initially happened I  was very scared. Note that this is the first( and only) time I dropped my camera so I was freaking out about it breaking. My mom paid a lot of money to get me this and if I break it, not only would my mom kill me, I would kill myself. The reason that my camera dropped was because I lost a part of my neck strap. I lost one of the little plastic things your loop the straps into to make it stay. They way I tied my the staps to my camera were really bad so that's why it fell.

In the end it was nothing to bad. It has a mark on the side and the lense go dirty but the camera still works and that's the most important. This is a reminder to always have a secure neck strap on when you are going out to take pictures. I use the one given when you buy the camera but I know some people make their out straps.

I love love LOVE my camera but that doesn't mean I'm gonna be perfect. I will drop it more times and I will touch the lense by accident but hopefully I don't.

Thank you all for reading and please check out my Instagram at www.Instagram.com/Exposureyourself and follow and like all my pictures. Hope spring brings . warmer weather and I'll see you at my next exposure.

-Jess

Friday, April 3, 2015

Free Choice Friday(#1): Intro to Computer Science

Hello everyone!

This is my first Free Choice Friday. This is where I talk about  something that isn't photography based.

Today I am going to talk about another new class I am taking this semester. I know I have been taking a lot of new classes. This class is called Intro to Computer Science. The reason I was interested in this is because my uncle is really good with computers. Another reason is that I realized that since I use a computer so often then maybe I should actually learn how programs are made. Computers are very interesting machines that, if you ever have a chance, everyone should learn about.

What is this class?
This class is about computer programing. The program you mainly learn is html. The beginning of the class you learn number system and problem solving. So if you really want to learn programming then you might be a little bored in the beginning.

How did you hear about this class? 
-I heard about this class because my math teacher in 11th grade is the teacher of the class. Since it is a new class this year she was promoting it last year.

Is there homework/tests? 
-There is some homework. If you don't finish you homework in class then you have to finish it in class. My teacher doesn't check the homework everyday but she does sometimes so you should always do your homework. There a tests too. The reason there are tests is because this class is preparation for the AP computer science class.

Do you like html?
-I do like html. Its pretty simple, the only thing that is hard about it is that there are a lot of codes that you need to know. What I do for now when I code is that I keep the note sheets that my teacher gave to me and whenever I don't know a code, then I look at my notes.

Do you want to do more coding in the future?
-I want to take coding classes in college. This is a skill that I want to remember so if I don't keep practicing it then I wont remember it. I might not take classes in college because I don't want to have too many classes to stress about so if not then I might join a coding club.

Do you like the class?
-There are a lot of things that I like about this class. One of my close guy friends is in the same class as me. I really like taking to him because he's really funny and can make me laugh. Also the teacher is my favorite Math teacher so I'm glad I can hang with her cause she's awesome. Then coding in general is just fun to me.

Thanks for reading my blog and please check out my other post on here. Also follow me on Instagram @Exposureyourself. Until next time, I'll see you at my next exposure.

-Jess

Saturday, March 28, 2015

The fallen of a loved one...

Hello everyone.

Today is a very sad day in my life. I have learned that one of my beloved has gone and will never come back. But even though that is such a sad time that doesn't mean that we can think of a positive light of it.

I would like to send a message today to... protect all you SD cards!

Yes you read correctly, I have damaged one of my SD cards and all the pictures on it has been lost. I am really pissed because my next digital project was on that SD card so I guess I have to retake all those pictures. I don't even know what really happened to my SD card. All I know is that I kept it in my backpack for a few days. I kept it by itself with no protection around it. I had thought it was in a small plastic bag but I guess I took it out without remembering to put it back into the bag. The next time I went to use it in the camera it said that it has been damaged and I couldn't use it. I took me all period to figure out what happened to it. What I determined is that the SD card had been magnetized by my phone.

I am not really sure that is what really happened. All I know is that I have to take care of  of my SD cards with more care. So what I would like to tell all of you is to take care of your SD carefully if you are going to be taking the SD card in and out of your camera a lot. DO NOT make the same mistake I did and think that your SD card is indestructible. You might think that all your photos are crap but then when you lose them all you feel like a big fat loser. I would suggest to always keep it in a little plastic bag or you could put them in those SD card plastic cases.  Photo are important so keep them safe!

Sorry for not posting for 2 weeks. School and life has been crazy but hopefully I can get back into it.

Thanks for reading and I'll see you at my next exposure!

-Jess

Friday, March 13, 2015

Film vs Digital

Hello everyone!

So as you all know I have joined a new photo class this year called digital photography. If you didn't know you can read my post about it here.

Anyway, so one of friends form AP photo is in that class too. I was really excited because she is one of those friends that I don't talk to too much so I was happy that I could spend time with her in this class. BUT she wanted to drop that class. I didn't really understand why she wanted to drop because I thought she would like the class a lot. When I asked her this is what she said, "I think I'm so use to the film camera that when I take pictures for digital I don't get the same feel. I don't know I just don't like it."

First of all what? If you love photography then you should love all types of photography. I mean DUH.

But she ended up have to stay in the class because she is required to take a least 5 class. SUCKS.

Any a ways this got me thinking of the differences between digital and film.

Film
  • when you are taking a picture it is all manually
  • you can't see your pictures when after you take a picture
  • have to learn to develop film and make the prints (the pictures aren't going to just print out for you)
  • no color! black and white
Digital 
  • Pictures are much faster because it's all auto. 
  • You can delete pictures you don't like
  • a lot more photoshop
  • automatic if you don't like or bad at focusing 
Which one do you like better? 
- I like different aspects of each. For film you feel more satisfied when you have a good picture. Each picture for film is a lot of work so when you get a good picture and you print it yourself  you feel very good about yourself. For digital, all it take is as click and you have a picture right in front of you.
-What I like more about digital is color. After years of taking pictures that are only black and white, I am really happy that I can take more pictures in color. Also I really like photoshop.
Do you have to shot differently when switching from digital to film? 
-Yes you really do. I think now I'm so use to it that I know when I have to think film and think digital. For film you really have to think of the lighting. Different lighting can really change your photo a lot. Also you really have to think in a black and white. If you think in color there is not way that you picture will come out the why you want it.

Overall thoughts
Over all I think there really isn't a lot of differences between them. Yeah there is a lot of technical differences because of the way you use them but you do have to think in a very photographic way. I guess it makes sense if the only way you see it is in a film sense and can not grasp it(or the other way around) that it is hard for you. My last thought of it is that you should try out both because think that building up your photographic eye is very helpful exceptionally if you going into it in the future.

That is all for today guys! I am so glad that the weather is getting nicer so I can go out and take a lot more pictures. I will try and post more pictures on my Instagram so if you want to follow me there is a link on the side. Tanks for reading and I'll see you at my next exposure!

-Jess

Thursday, March 5, 2015

Amazon Camera bag review

Hello everyone! Today I am going to review a camera bag I got from amazon.
This is the bag I got. I have been using it for a month or so. I had it for longer but only started to use it when I started to use my digital camera more.
I don't know if the picture shows it well but the back has a kind of sponge-y feel to it. I have felt this material before on backpack straps.


The side of the bag is where you attach the strap. Also on each side there are pockets. I don't really understand what the side pockets are for because they really cant fit anything.

This is the inside of the camera case. There are 2 velcro straps but I only like to use 1.  


This is the only pocket I think is useful. It have a special place put SD cards. 

First Impressions 
When I first got this bag I was so excited! I got a camera a long time ago and was always afraid to take it places because I didn't have a bag for it. I really liked the color of it. Black and orange is a really nice combination. I liked that it was light weight because the camera I have is quite heavy, 

Pros
-My camera fits well inside of the bag. I can fit my camera, camera strap, and camera charger inside of it. 
-It doesn't and any extra weight 
-It was inexpensive 
-The extra pocket for the SD card is very useful. 
-The bottom is made out of plastic that allow it to 

Cons
-It is a little bit annoying if you bring it somewhere and don't need your camera inside. Like when I went to the mall the other day I carried it in the bag. When I got to the mall I took out my camera to take pictures and the bag itself is annoying to hold. If you take out your camera to take picture, you don't really need the bag anymore to take pictures. In that case you then have to just hold the bag by itself.

Overall
Overall I give this bag a 4 out of 5. There were only minor things that really bothered me about the bag but I do really love it. I hope to take it to college where I will take more and more pictures. 

If you want to buy this bag you can get it here

Thank you for reading and please follow me on instagram @Exposureyourself. I post my own pictures and update when I have new blog post. Please share my blog with anyone you think that would be interested. It would appreciate it very much. 

Have a wonderful day and I'll see you at my next exposure!

-Jess 

(Note: comment if you see any spelling errors and I will change them right away.) 

Tuesday, February 24, 2015

Tips and Tricks Tuesday(#1): AP Photography

Hi hi everybody! Today is going to be my first feature for Tips and Tricks Tuesday. I will try to do this as often as I can so please leave suggestions down in the comment section below.

If you don't know what AP Photography is please check my other post here explaining what AP Photography is.

Tip #1
Before picking a concentration you should have at least 3 in your mind that you like. Before starting the school year you have to take 5 rolls of film in the summer. While taking pictures over the summer is when I was thinking about concentration ideas.

Tip #2 
When you finally decide on your concentration try and take at least 2 rolls of film early on. This will help you determine if you like taking these kinds of pictures. Also this will help you see if you are good at making these kinds of prints.

Tip #3
Always try and have extra paper and film with you. You don't want to be in the middle of a print and run out of paper. You don't want to not have film when you run out of pictures to make.

Tip #4
When making prints try to at least make 2 prints a week. 1 print a week is ok but you might fall behind. Having my prints to show is better than having not enough prints.

Tip #5
Try to scan your prints as early as soon as possible. Maybe take a day in class where you have no prints to make and just scan everything. You don't want to be scanning everything in the last minute.

Tip #6
Make an AP account early. Even if you aren't uploading your prints yet make sure you have the username and password set up.

Tip #7
Try to remember when you are going to different places so you can ask to borrow a camera. Always try to bring a camera if you go away over the break or the weekend.

Tip #8
Talk to your teacher. Ask them any question you have because they probably have the answer. If they don't have the answer then they could find it out for you. Don't be afraid to question but you want to get the highest grade you can.

Tip #9
DON'T FORGET TO GIVE IN YOUR CHECK! If you don't hand in your check on time then you won't be able to send in your prints.

Tip #10
Have fun! This class is really enjoyable if you just do your work. It's fun being in a class with other photographers that are working on the same project as you. You get to go on fun trips and learn a lot about photography. It might be an AP class but that doesn't mean it's all about working.

Thank you for reading my post today. I hope it was helpful for all of you going into AP photography. I hope you all have a wonderful day and I'll see you at my next exposure!

-Jessica

(Note: If there are any spelling/grammar errors then please tell me and I'll change them as soon as possible)

Thursday, February 19, 2015

Class: AP Photography

Hello everyone!

Today I am going to be talking about a class I am taking in school. It is called AP photography. 

What is the class?
-This class is about taking pictures with a film camera. You have to develop the film manually with chemicals and such. After making the roll of film you then I have to make each picture individually. To print each picture you have to use photo printing paper for film. To change the contrast of each picture you have to use an assortment of color filters to change the look of the picture. 

What is required before I take this class?
-To take this class you have to had taken photo 1, 2, and 3 before you request taking the class. 
-Before starting school, you have to take 5 rolls of film over the summer. 

Do I need you need your own camera?
- At the school that I go to, they supply us with film cameras already. I do not have my own film camera. Ask your parents because they might have one. (Note: all schools are different so your school might not have their own film cameras to lend out.)
-If you are planning to pursue photography as a career then I highly suggest that you get a film camera of your own. The problem with the school supplying the cameras for you is that at times they might not have a camera available for you to borrow. Note that there are other classes that need to take out cameras. 

Do I need to buy anything for this class?
-Yes you do have to buy some stuff for this class. You have to buy all the rolls of film to take pictures and all the paper use to print your photos. 

What kind of paper/film do I buy? 
-The film for the cameras I use is the Kodak Tri-x400 135-36 36mm Black and White.
-The paper is Ilford Multigrade IV RC Deluxe Resin Coated VC Paper, 8x10. You can either buy glossy or pearl paper. I usally buy glossy. 

Where can I buy film/paper?
-If you ask your teacher there might be a photo store around you that you can buy film from. I usually buy my film and paper online. In my school they have a school store where they sell film but it is more expensive there. 
-I find that buying online is cheaper because you can buy in bulk but it does take a while to come so try to buy early. 

How do you like the class?
- I do really enjoy being in this class. It is very stressful at times because I always feel like my pictures suck (lol) and making enough pictures every week. We have to take a roll of film every other week and sometimes my teacher collects prints to collect. The only thing that really bothers me about the class is the people in the class. Sometimes I feel like that the people in the class are not serious so it is kind of annoying to see them not doing anything. But other than that, nothing else really makes me hate the class. 

Well that all for today! Please leave anymore questions down in the comments below. Have a wonderful rest of the day and I'll see you at my next exposure.

PS- Happy Lunar New Year to anyone celebrating! Happy year of the ram/goat! May there be good luck and prosperity for your new year.

-Jessica

(Note: sorry for any spelling/grammar problems. If you see any please contact me and I'll change them right away.)

Wednesday, February 18, 2015

Class: Digital Photo

Hello everyone!

Sorry I haven't wrote a post in a while but I will try to start writing more post.

Anyway, the conversation of the day is the new class I am taking in school. In my school we have just finished the first semester and we are transferring to the next. This means I have new classes and have to start my PIG paper -.-. But enough about PIG and onto the post.

The new class I am taking is called Digital Photo.

What is this class?
-This class is pretty self explanatory. You will be taking picture on a digital camera based on different projects that the teacher gives you. We also learn to photoshop our photos (it is very minimum photoshop based on my advertising and design class).
-you are aloud to use a DSLR camera or a point a shot camera. You are explained how to use the different functions on the DSLR so if you only have a point a shot camera, the explanations of the different functions might be boring for you.

Do I need a DSLR for this class?
-Like I said in the last question you can use a point a shot camera if you don't want to spend a lot on a DSLR. You might get bored when the teacher is explaining the DSLR functions. But it might be good to listen to because if you are planing on getting a DSLR in the future then knowing the functions would be beneficial.

How much photoshop do you do/learn?
-I also talked about this in the first questions saying that you use minimum photoshop. The main functions on photoshop that you learn are color retouch. You will learn how to use the crop, stamp, burn/dodge, erase, and brush tools. You will also learn how to change the levels and curves of your picture.

Why did I choice to take this class?
-I have been doing film photography for 2 years now and I have never done digital photography so I wanted to explore it. I knew that after I get out of high school then I wouldn't be working in film photo anymore. I still want to do photography after high school so the best option is digital.
-I didn't want to be like all those photographers on tumblr and instagram that have good cameras and take picture. I want to be a legit photographer that knows now to use a DSLR and not just have a camera to take good picture. (Note: if you have a good camera and want to just take picture that is totally fine but that is not the kind of photographer that I want to be).
-I had took a Photoshop class last semester and wanted to continue so I wouldn't forget how to use the program.

Recommend to take this class?
-If you do have a class like this in your school then I highly recommend it. Learning how to work your digital camera early will steer you in the right direction to taking better photos.
-Note: all schools are different so if you want to take a class like this please ask your guidance counselor for help

These are all the questions I'm answering now. I have only been taking this class for abut 2 weeks so I will make an update post answering more questions about this class. If you have any questions please leave them in the comments below. I also will post some of my pictures that I take during this class.

Thank you for reading and I'll see you at my next exposure.

-Jessica

(Note: If you see any grammar or spelling mistakes please comment below and I will fix them as soon as I can. )

Saturday, January 31, 2015

How to use a film camera: Canon


Hello everyone! Today I am going to teach you all how to use the Canon film camera. This is the first camera I got to handle myself because this is what I learned in my photo classes in school. I have used a regular digital camera before but it wasn't all for myself. In our photo class we get to borrow theses cameras for a day or a weekened and we give them back the next school day. There are others types of film cameras and they are all a little different. If you guys want me to make a blog post about the other cameras please comment below. 

Disclarmer: I do not own one of these cameras. If you would like to buy one yourself I know they sell them online for $100+. 


 This is the top view of the camera. You can see that there are 3 sections to it. There is a left a right and the lens area.


This is the left side of the camera. This part is important becuase this how you put the film in. Remerber this is a FILM camera. You have to put the film in manually and take the film out manually.

To open the back and put in film you have to flick up the lever and pull it up. 

After you opened the back it should look something like this. As you can see there is the view finder on the top. You put in your film cartridge on the right and slid your film across and into the left side. 

If you want a more indetailed explanation in how to put in film then comment below. 


This is the right side of the camera. Here is has the shutter speed settings and the shutter button. There is also a dial to show what how many pictures you have taken. 


This is the shutter release button. This is to take the pictures. 


This lever is to advance to the next shot after taking a pictures. You must pull this after every picture you take. If you don't the shutter button will not click. 

This area of the camera is the lens. 

The top area is for focusing. You turn it left or right to get the picture in focus. You mush focus the picture as you are looking through the view finder. 

I took this picture with my phone so it is not a very good picture but hopefully you can still see it.
To focus your image well you have to use the circle in the middle. What you have to do is line up the picture on the horizontal line in the middle of the circle. Turn the focus ring left and right until the image you are looking at is clear. This is hard to explain in words but once you take a few pictures and practice you will get the hang of it.

The bottom part of the lens is the aperture setters. This will determine how much light you are letting into the lens. 22 is the smallest amount of light and 1.8 is the most amount of light. If it is dark outside, then you should have your aperture on the lowest settings. 

There is a needle on the side when you look through the view finder. There will be a needle that will move up and down when you half click the shutter button. This makes it easy becuase you can stay on one shutter speed the whole time and just change your aperture. 

So yeah, using a film camera might seem hard but the more practice you get using the camera the easier it will get. I know my explaination wasn't the best but I hope it helped you guys or anyone who wants to do/try film photography. 

If you would like me to talk more about film photograohy or post some of my work then comment below. 

Thanks for reading and I'll see you at my next exposure. 

-Jessica

(Note: If you see any grammar or spelling mistakes please comment below and I will fix them as soon as I can. )